Sunday 1 December 2019

North Eastern Corner Part 4

I've been pottering about the layout making small progress in little bits. Here's where I'm up to.

4. Sort out fences - paint them too. In progress. - fences on order. Still waiting
5. Create back yards. In progress.
6. Glaze and light houses. 
7. Add static grass and trees to landform. In progress. Waiting for fences to do this in one go.
8. Create platform for loading dock. In progress. Needs tarmac top.
9. Place on the layout. 
10. Ballast the siding and the mainline. Completed
11. Build the new building for the conveyer to run from.
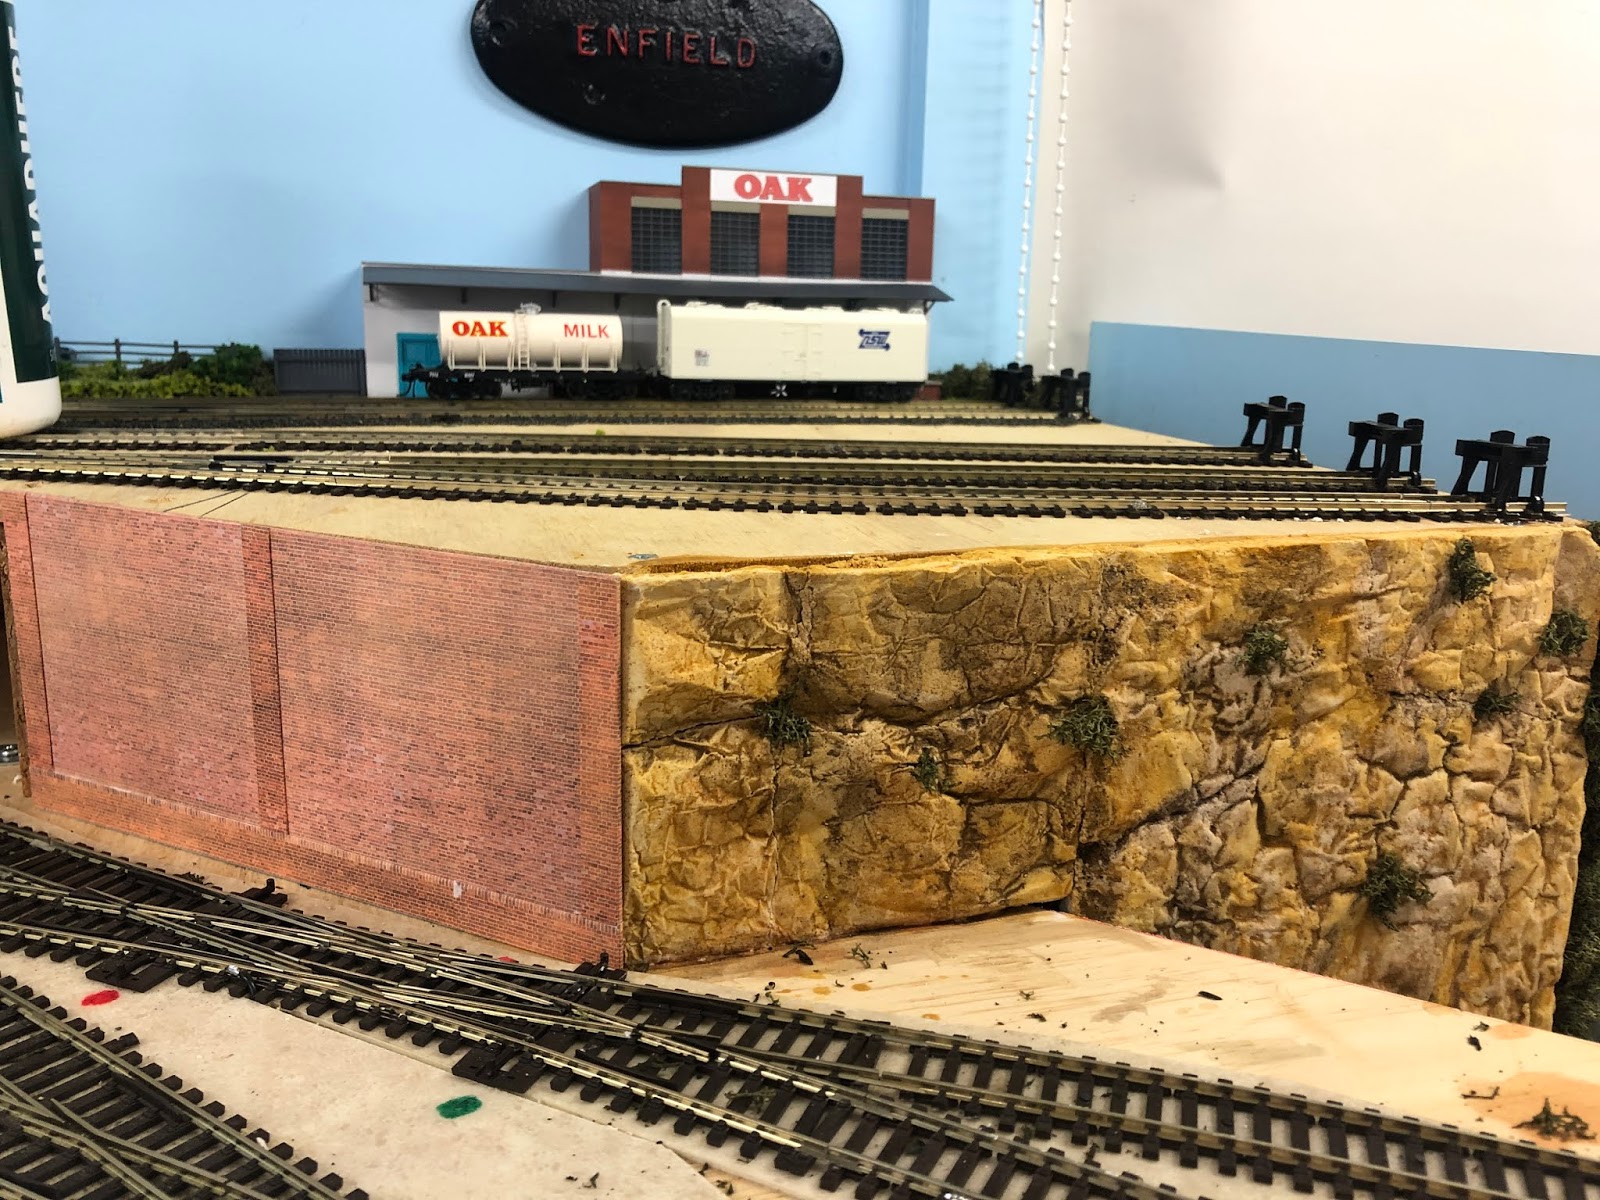
12. Plaster Goods Yard. Completed Used sand paper instead.
The image above has just had a bunch of scatter material and static grass put down. The sand paper gives the goods yard area a bit of compacted dirt look. I'll experiment with some paint to try and match it to the panted plaster in the foreground.
13. Ballast Points near the station.
14. Build signal box for the station.
15. A fence, or hedge for the station.
16. Build grain unloading facility for brewery.
17. Finish brewery. In progress.
18. Finish industry next to brewery. In progress - needs some detailing.
The brewery and the other industry are on separate boards. The brewery needed to be raised as the wagons hit the awning roof and the platform was a bit low. The other industry (an engineering company) is on some matte board covered with tarmac paper.
19. Build warehouse backs for back scene between Brewery Lane Station and houses.
20. Retaining wall in front of brewery and the next door industry.
21. Finish off static grass and scenic touch ups. In progress.
22. Paint the sides of the tracks. In progress

I've a busy week this week. The overnight work thing that was postponed due to catastrophic conditions is on this week and I've a couple of evening meetings. I reckon that my fifteen minutes a day might not be much more than that this week.

Until next time.

Saturday 16 November 2019

22. Paint the sides of your rails


22. Paint the sides of your rails In progress. (See the previous post and comment for context.)

Thanks Bob. It looks much better now. I did both sides too, where I could.

Until next time.


North Eastern Corner Part 3

The baseboard was painted and the track ballasted.

After that the gap between the polystyrene and the baseboard was covered up with lichen and foam. A bit like a skirting board.

Two different shades of ballast were used. I think that they are both different shades of Bombo Ballast from Matt's Ballast. The finer, dirtier ballast was used for the siding. The cleaner stuff was used for the mainline. It's slightly coarser which would suit for a well maintained line.

The bare board in the foreground will be part of a goods yard and will be fenced off, and the board covered in a light layer of plaster and painted to represent dirt or perhaps tarmac.

The scenic skirting board travelled most of the length of the new landform.


It occurred to me that the the greenery around the ballast loader might be covered in some spillage. I scraped away the vegetation that I had just put down and had another go.


After looking at some embankment lately, I noticed that a lot of them have a whole heap of things growing on them.


I popped into my local hobby shop and picked up a couple of packs of the Woodlands Scenic Fine Foliage. They're sometimes also referred to as tree armatures.Holes were poked into some of the plaster, the armatures dipped into glue and then planted.

I though that buying a couple of boxes would last me for a few years but some of the armatures are pretty much trees in their own rights. See the image below.


It's also a touch of before and after between the first and last photos.

What is next? Here is the old list from last weekend list with amendments.

1. Glue the polystyrene together. Completed.
2. Coat it with plaster.  Completed.
3. Paint it.  Completed.
4. Sort out fences - paint them too. In progress. - fences on order.
5. Create back yards. In progress. 
6. Glaze and light houses. 
7. Add static grass and trees to landform. In progress. One yard to go.
8. Create platform for loading dock. In progress. Needs tarmac top.
9. Place on the layout. 
10. Ballast the siding and the mainline. In progress. Track behind the brewery is still yet to be done.
11. Build the new building for the conveyer to run from.
12. Plaster Goods Yard.
13. Ballast Points near the station.
14. Build signal box for the station.
15. A fence, or hedge to the station.
16. Build grain unloading facility for brewery.
17. Finish brewery.
18. Finish industry next to brewery.
19. Build warehouse backs for back scene between Brewery Lane Station and houses.
20. Retaining wall in front of brewery and the next door industry.
21. Finish off static grass and scenic touch ups.

I reckon that the brewery might get a look in this week.

Until next time.

Tuesday 12 November 2019

North Eastern Corner Part 2


Catastrophic fire conditions in Greater Sydney saw my overnight work trip on Monday cancelled and my workplace closed on Tuesday.

There are some silver linings. I was able to knock off some things on the list posted on Sunday night.

The first was to glue the polystyrene together. The two notches are for wires for the lights.


It was held in place with some masking tape. Then it was covered with Plaster or Paris, poured on and spread out with a paddle pop stick.


After it had dried, I painted it with a wash of acrylic paints - the same shades used on the embankment earlier.


Granted it doesn't look amazing but after a bit of static grass magic is applied it should look better.

Today, I applied the glue and static grass. Not all of the grass was applied today. I wanted to make sure that the glue was dry left and right of the where the white house is. The is none around the ballast loader as I want to put a building in that location first.


I painted a fence for a park next to the white house. I thought that I had enough of the Walthers wooden fencing to complete the job but I want big back yards. Some more is on order, as is a playground. I'm going to hold off on this part until I get the fences and the playground. Then I will be able to finish this in one or two evenings.

It's a little disappointing that I've put the houses so high up as I can't easily see into the back yard with the fence up, (The top image shows the view.) especially as I have a whole heap of vegies to put in the gardens. However, I reckon that I'll put them in anyway. I have a step stool so visitors can stand on that to see the garden.

The foam doesn't quite sit right on the board. I'm hoping to cover the gap with some vegetation. I could glue it down but I want to be able to remove this when I need to.

The base board needs painting before I get much further and the track needs some ballast. I reckon, they'll be the next tasks.

Until next time.

Sunday 10 November 2019

The North Eastern Corner

With the embankment as far as it can go for now, my attention has turned to the north eastern corner. It has a couple of houses and a ballast loader.

Initially, the ballast siding was to head further into the corner using first radius track. It would disappear under a hill and run hidden beside the main line. The scenery was to be made to trick the viewer to think that the line was going the other way.

However, after reading about the blue metal siding in Richmond, I thought that this could be a good alternative. The siding ran beside the mainline to Richmond with a ballast loader next to siding. The siding wasn't long and it certainly wasn't designed for the filling block ballast trains but one or two BCH type wagons.

I stumbled upon an YouTube clip which showed 620/720 sets running in and out of Richmond station which showed the facility as the rail motors went past. It looked as though blue metal was run up in buckets which tipped onto the side loading facility and down a chute into the waiting hopper.

All I had was a screenshot of the YouTube clip. It looked impressive and would be a challenge to build but...

I had told someone recently that I wanted all of Awdry up to the Brewery Lane Station finished by Christmas. Scratch building the facility would be time consuming, as would loading the trains with ballast.

I also have a big coal mine kit an I know that there is one bit that I won't be using. Could that fit the bill? It would be quicker to build. So build it I did.


It is great for a coal mine but way too big for my two neighbours who live nearby in Polystyrene Heights.

Martins Creek has a ballast loader right? A quick internet search brought up a couple of images on Flickr. It has a smaller loading bin with a conveyer bringing ballast up to it.

I reduced the loading bins from three to one and reduced the height of it. The shed on top was also reduced.


There is a weight distribution problem to be solved soon, as well as another building for the conveyer to run from. Some more polystyrene was cut and shaped. The front end loader won't live there as it is way too big for the loading dock. The loading dock is for supplies for explosives and other stuff. 

The above image doesn't do the new cut down loader any justice. This one might help.


What is next?

1. Glue the polystyrene together.
2. Coat it with plaster.
3. Paint it.
4. Sort out fences - paint them too.
5. Create back yards.
6. Glaze and light houses. 
7. Add static grass and trees.
8. Create platform for loading dock.
9. Place on the layout. 
10. Ballast the siding and the mainline.
11. Build the new building for the conveyer to run from.

Some of these things don't have to be in that order

Work has me away tomorrow night but I reckon Tuesday eventing could see a couple of these tasks knocked off the list.

Until next time.


Tuesday 29 October 2019

More Embankment


Over the plaster, I added a wash of gold ochre, burnt umber and black acrylic paints. I painted it on with a brush. It turned out pretty good.

The next step if the houses in the corner. I'll need to try and cut another bit of foam as I think I have taken too much land off one of the houses.

However, with an ops night on Thursday, tomorrow will be a tidying up evening.

Until next time.

Monday 28 October 2019

More Plaster

I re-plastered the embankment with some think plaster. It maybe too thick, but we'll have to wait and see.

I've ended up smearing the plaster on with gloved fingers. It doesn't look too bad as it is. By the time it's painted and scenery material added it shouldn't look too shabby.


While I was there, I started on the hill with the houses in the corner. I cut some polystyrene using a craft knife and whittled bits of it off until the foam was nicely formed.


It's not in the right place but it's easier to take a photo. One of the houses isn't going to make it from the top image.

What's next?
1. Give the embankment a wash.
2. Add some bushes.
3. Paint the foam.
4. Create some gardens.
5. Fences.
6. Tidy up for an operating session.

Until next time.

Sunday 27 October 2019

A Bit of Plaster

The last update had points installed. Sine then I've had a couple of operating sessions. Operating sessions do tend to slow down progress. But there has been some.

Around the back of the main freight yard (Boydtown Yard) and underneath Awdry there is an embankment. I've used a a lot of retaining brick wall so far and for the curved section I thought that I would make a plaster rock face.

First I filled some gaps with some scrap foam core boards.


Next I used some masking tape to create a something for the plaster to stick to.


Then I put on some plaster.


Then I used the crumpled alfoil mould method which I had used before. The only problem was that I had poured too much plaster in and made it too thick. I also ran out of plaster as I only bought a small bag.

Now that I've been able to get to a hardware to buy another bag, I'm going to put more plaster on and put my alfoil mould on top of it. That's tomorrow's job. What could possibly go wrong.

I've a operating session coming up this week so I'm hoping it'll be sorted by then.

Until next time.


Saturday 31 August 2019

Ah... Winter

This video by Kathy Millatt cropped up on my Youtube feed a couple of weeks ago.


I'm not saying that I've lost my mojo. The long silence is due to a winter illness - it a sort of occupational hazard in my line of work. And this year it brought it's a game.

I've had a couple of other railway related things going on as well, so they have take up the fifteen minutes a day that I philosophise.

If you haven't already seen this clip, give it a go.

Until next time.


Wednesday 26 June 2019

Putting things off.

You know those jobs that aren't really difficult but you want a bit of time to do them? Like installing point motors for example.

It has taken a while to put them in. Not because it was a difficult task but because it was a little awkward. It involved soldering and drilling and pulling stuff out from under the layout. Not hard stuff but a reckoned that it would take me a couple of hours, so I kept putting it off until I could tackle it in one go. I should have looked at other jobs to do but that seemed too difficult.

It took a little bit more time than I thought but I took my time and the job is finally done.

The point motors are for the top station of Awdry as a couple of the points are out of arms reach and require a little stool to operate. Not any more.


Four point motors were installed. Three at the end of Awdry station (top) and one ate Brewery Lane station. (Bottom) The latter allows access to the grain silos.

One of the points at Awdry required a bit of packing to operate properly.

Tonight's effort was using my new Peco Static Grass Applicator. I threw the old one out as it wasn't as safe as I thought. The Peco one is much better and less likely to stop your heart. It was a very narrow strip between the track on the edge of the top level but it still needed some grass.


As I have an operating session in the first week of the month, I am not too keen to do anything too major with the layout. A bit more ballasting and retaining wall building will probably fill the time between now and then.

Until next time.


Saturday 25 May 2019

Cattle Yard

With the tarmac down, the next bit along is the cattle yard.

The ramps and pens were built for an Inglenook style shunting layout in 2002. I was using four wheel wagons, mainly S trucks and a sheep van. They were reused in 2005 when I built a larger layout and needed a cattle yard. 

The yard is small but considering that it is on the edge of the baseboard I reckon that I can get away with it.


I have been thinking about how to get some dirt texture onto the plywood. To be honest, I was going for something cheap and easy for a Thursday night. The answer came with sandpaper. I have heaps of it that I bought years ago. I cut out some 240 sand paper and dry brushed it with some dark brown acrylic paint. There were a couple of sections that weren't dry brushed and didn't look good. I rubbed this bit off with my finger and dry brushed it again.

It was glued in place and left to dry.

The pens needed a little bit of repair, as did the ramps. For the tall ramp, one of the long supports needed to be replaced. The ramps were originally scratch built with Evergreen styrene. The fences are from Atlas. There was more fencing but it hasn't seemed to survive as well as the pens. New fencing was added down the sides. I'm hoping that the the way they finish at the edge of the baseboard gives the impression that they carry on towards the viewer. These fences are the same kind used for the cattle dock on Billabong Marina and the the grassy car park by the station.

The repairs are a slightly different colour and I'm okay with that because they are bits which were recently repaired.

It was all stuck down with PVA and few bits of green added for good measure. The cows are removable. No pun intended.

The bare plywood next to the cattle yard has since been painted burnt umber so that I don't make the same mistake when putting the static grass on the next section.

The next step is to ballast that bit of track and put down some more grass. Sooner or later though, I'm going to need to wire up some points. That might be a job for the long week end.

Until next time.

Tuesday 21 May 2019

Sometimes Things Need To Be Done Twice

Work on the next bit was going well. On day one the next section of wall below Awdry was cut out and Scalescene's red brick glued on top. Day two saw most of the plinth added, except that I ran out of brick paper. I printed another sheet off and it was a different, more saturated colour.

I experimented a bit and worked out that with my Epsom printer (a really cheap inkjet), if I print off more than one sheet, then the colours are faded.

I don't know why. It didn't happen with the old printer. 

I printed off a whole heap of new sheets of brick paper in individual one sheet jobs. Check out the difference. The top half is the first attempt.


The wall was finished and a quick trip to the layout yesterday saw the tarmac put down for the loading area and the coal conveyer.


The next bit to sort out is the small cattle yard next to the tarmac.

Until next time.


Saturday 11 May 2019

The Oil Depot Part 2

The oil depot is finished. 

The area was given some static grass and other bits of foliage. One mistake that I did make was not painting the baseboard first. This meant that some pen marks made on the baseboard were visible. I think that I may have tried to cover too big an area at one time and some of the glue had dried. This led to bald patches.

However, both of these issues were covered up with a bit of extra stuff.

Once everything was glued and stray bits vacuumed up, Billabong Marina was reattached. The chunks of lichen have come close to completing the job which I had intended. It might need a couple of more bits added.


The plywood that you can see will be covered up later.

The oil depot isn't looking too bad though. The oil loading platform had its damaged bits reattached (except for one of the filling pipes which is somewhere but not readily found) and placed into position. The platform must be about old enough to vote in the coming election and has been on a couple of other layouts before. It is made from two Walthers kits joined together.

As well as static grass, dyed sawdust, foam ground cover and lichen were also used to add some more character to the area. I also added some Noch laser cut flowers to add some small pops of colour. I have no idea what types of plants they are.


 I know that there will be some bits that not many people will be able to see without a step ladder but I have a couple of tall people in my operating group, I know that they'll appreciate the efforts.

What's next?

To be honest, I need to clean up a bit. I have another operating session planned and I need to put some things away.

After that, I have this little section:


It is a small little siding which hold no more than three bogie wagons. One spot will be for a small cattle yard. I have a few cattle wagons and they need a destination or two. The local dairy farmers will need to ship their cows in from somewhere and this cattle yard will help them out. The second spot will be for whatever needs to be unloaded there. The last spot is for unloading a coal hopper using a mobile conveyer. 

When I was at the Strasburg Railroad in the States last year I saw a grain hopper being unloaded into a truck using a conveyer. Model Railroader had an article about unloading coal hoppers into trucks using a mobile conveyer with one of their special project layouts as a small industry. I also found a pack of the Walthers kits in the model shop across road from the Strasburg Railroad. I thought that I could maybe modify it to unload grain. I haven't looked into it too much yet. In each pack, you get three of the mobile conveyers, so I reckon I'll get to it eventually.

Here's the plan for completing this section.

1. Make more retaining wall.
2. Use Scalescenes tarmac files for the coal unloading and middle wagon spots.
3. Repair the cattle ramps and adapt the fencing for the stock yard.
4. Find something suitable for the surface of the cattle yard.
5. Ballast track.
6. Add some more grass.

Until next time.

Monday 6 May 2019

The Oil Depot Part 1

Last week was pretty hectic with a couple of afterwork and evening meetings. This week has a couple as well. But I still made time for my fifteen minutes on the layout. 

Some of the tasks took longer than I had planned but there was progress every day. Here's a great tip which I wish that I had thought of ages ago. Always take a photo of you work when you have finished for the day. As you flip through your images, you get to see your progress.

The oil depot had its concrete base added using printed sheets from Scalescenes dock edge downloadable kit. It is just the same page printed over and over again.

Once the cardboard packing was cut out, a template was made by rubbing a pencil over the edges of the tracks. This was transferred onto thin cardboard and cut out. The sleepers take up about 5 mm of space. The concrete prints were then glued onto the cardboard. It was wrapped around the edges.


Once this was done, the concrete was printed onto thin card. This was then cut to shape and glued in between the rails. The whole lot was glued down using a Bostik glue stick.


A fence was added too. This comes from Kibri and is left over from building Billabong Marina. (Check out that blog here.) It was sprayed grey and glued in place. I used the glue stick again to tack it into place. When I apply the static grass the PVA will do a better job.


This afternoon's effort was adding some ballast. I'm using the list that I made last week.

Jobs for this week:
1. Apply static grass between the run around track and the first oil depot siding.

6. Glue more static grass (not on the same day or the grass sticks to the ballast.)

8. Repair oil loading platform. 

Seeing as items 1 and 6 are the same, it looks like I'll be up to the next section but the end of the week.

Until next time.

Sunday 28 April 2019

The Wall Part 1

The rock wall is in place and has a bit of greenery added. Overall, I think that the alfoil mould experiment worked well. I have ordered some casting plaster and bought some super strong foil for next time.


I also a started building a retaining wall. This was done with Scalescenes retaining wall kit. The kit was not built as per the instructions but made in such a way that it fits in the space available. If you've not seen Scalecenes before click here. You buy their kit and run it off as many times as you need to.

Everything finishes flush with the top of the above baseboard. The concrete for the oil depot will sit on top.

The retaining was was needed as the next section was a bridge.


More Scalescenes retaining wall was printed off. 

The brick wall is glued onto matte board used by people framing artworks or photos. I have some offcuts kicking about. The plinths at the bottom are glued onto double thickness cardboard. The columns are glued onto thin card and then glued on after the plinths have been added. At all stages of construction effort was made to wrap the paper around the cardboard.

The bridge was completed with some girder shaped Evergreen styrene strip painted grey. The inspiration came from the flyover at the western end of Strathfield station. I'll need to add some more to stick underneath the top baseboard to hide the empty cavern.

The aim of this was to complete this bit before finishing off the oil depot on the top.


Now I have started this bit. I have cut the packing cardboard from an old corrugated cardboard box. This had a bulk order of cat food in it. The large section near the camera will be the last bit to be glued down. I'm going to use Scalescenes concrete to complete the oil depot. This came as part of a dockside kit which I bought years ago. The gaps between the tracks will be glued onto cardboard and then glued onto the the packing cardboard. The large section will have the paper wrapped around the visible edge to tidy it up. In between the rails, the concrete paper will be glued to cardboard and then glued onto the sleepers.

Jobs for this week:
1. Apply static grass between the run around track and the first oil depot siding.
2. Finish off the packing pieces of cardboard. (I only have two bit to go and they are straight.)
3. Cut out the top bits of card and print sheets of concrete paper.
4. Glue it together.
5. Ballast track.
6. Glue more static grass (not on the same day or the grass sticks to the ballast.)
7. Put up fence.
8. Repair oil loading platform.

I'm hoping to get the top four done at least.

Until next time.


Monday 22 April 2019

The Rock Wall Continued

First thing this morning I had a look at the last night's mould. 


It looked pretty good so I trimmed it and glued it into place.


It was a little fragile which caused it to break. Some of the large piece I placed yesterday earlier was coming off the wall. A fair bit of PVA glue was used to stick it all back together.

I came back to it all in the afternoon. The walls were holding together well. I figured that it would be a good time to break out the paints.

When I researched making the rock walls, there were also videos on how to paint them. Basically, you make a wash. Most of the demonstrations were using grey as a base colour. I used a wash of raw sienna as a base colour for sandstone.


A bit of burnt umber was applied next to try and highlight some cracks.


This wash may have been a bit too thin and may was washed off some of the raw sienna.

A bit of gold ochre was dabbed on to add a couple of highlights. The paint had separated in the tube and wasn't that great to use.


In front of the rock wall will be a building but down the uneven edge, I'll glue some lichen. This will stick out from behind the Billabong Marina section and hopefully blend the two bits together. I reckon that I might glue some bits of flock on parts to represent small plants growing.

The section to the left of the rock wall will be a brick retaining wall leading up a bridge or a tunnel portal.

Once that is done, I can finish off the oil depot.

Until next time.

Sunday 21 April 2019

The Rock Wall Experiment

In yesterday's post I showed the mould for the rock wall. I  put it all together around lunchtime. I checked on the casting in the evening. It turned out pretty successful.


There were a tonne of bubbles which needed attention. It wasn't total dry but I figured that I could put it into place. A quick measurement and dry fit showed that It needed a trim. To do this, I used an old kitchen knife. It was a bit like a thick fudge. There was more than one go at cutting and trimming. The top broke off in a couple of places but that would add to the cracks.

In the end I put it into place.


This is where Billabong Marina meets the rest of the layout. As you can see, my carpentry skills aren't brilliant. I'm hoping that painting the right colour on the timber and gluing some lichen onto the corner will help hide the join and ease the transition.

I left it to dry over night but I reckon it might be a good couple of days before it totally cures.

In the meantime, I started on another section of rock wall, using the same alfoil mould.


I've bent the foil to make sides for a 10 x 13 cm section. I mixed up all of the remaining Polyfila powder and poured some of the excess into a section next to it as I might be able to use some of it later.

Until next time and happy Easter.