Sunday 28 April 2019

The Wall Part 1

The rock wall is in place and has a bit of greenery added. Overall, I think that the alfoil mould experiment worked well. I have ordered some casting plaster and bought some super strong foil for next time.


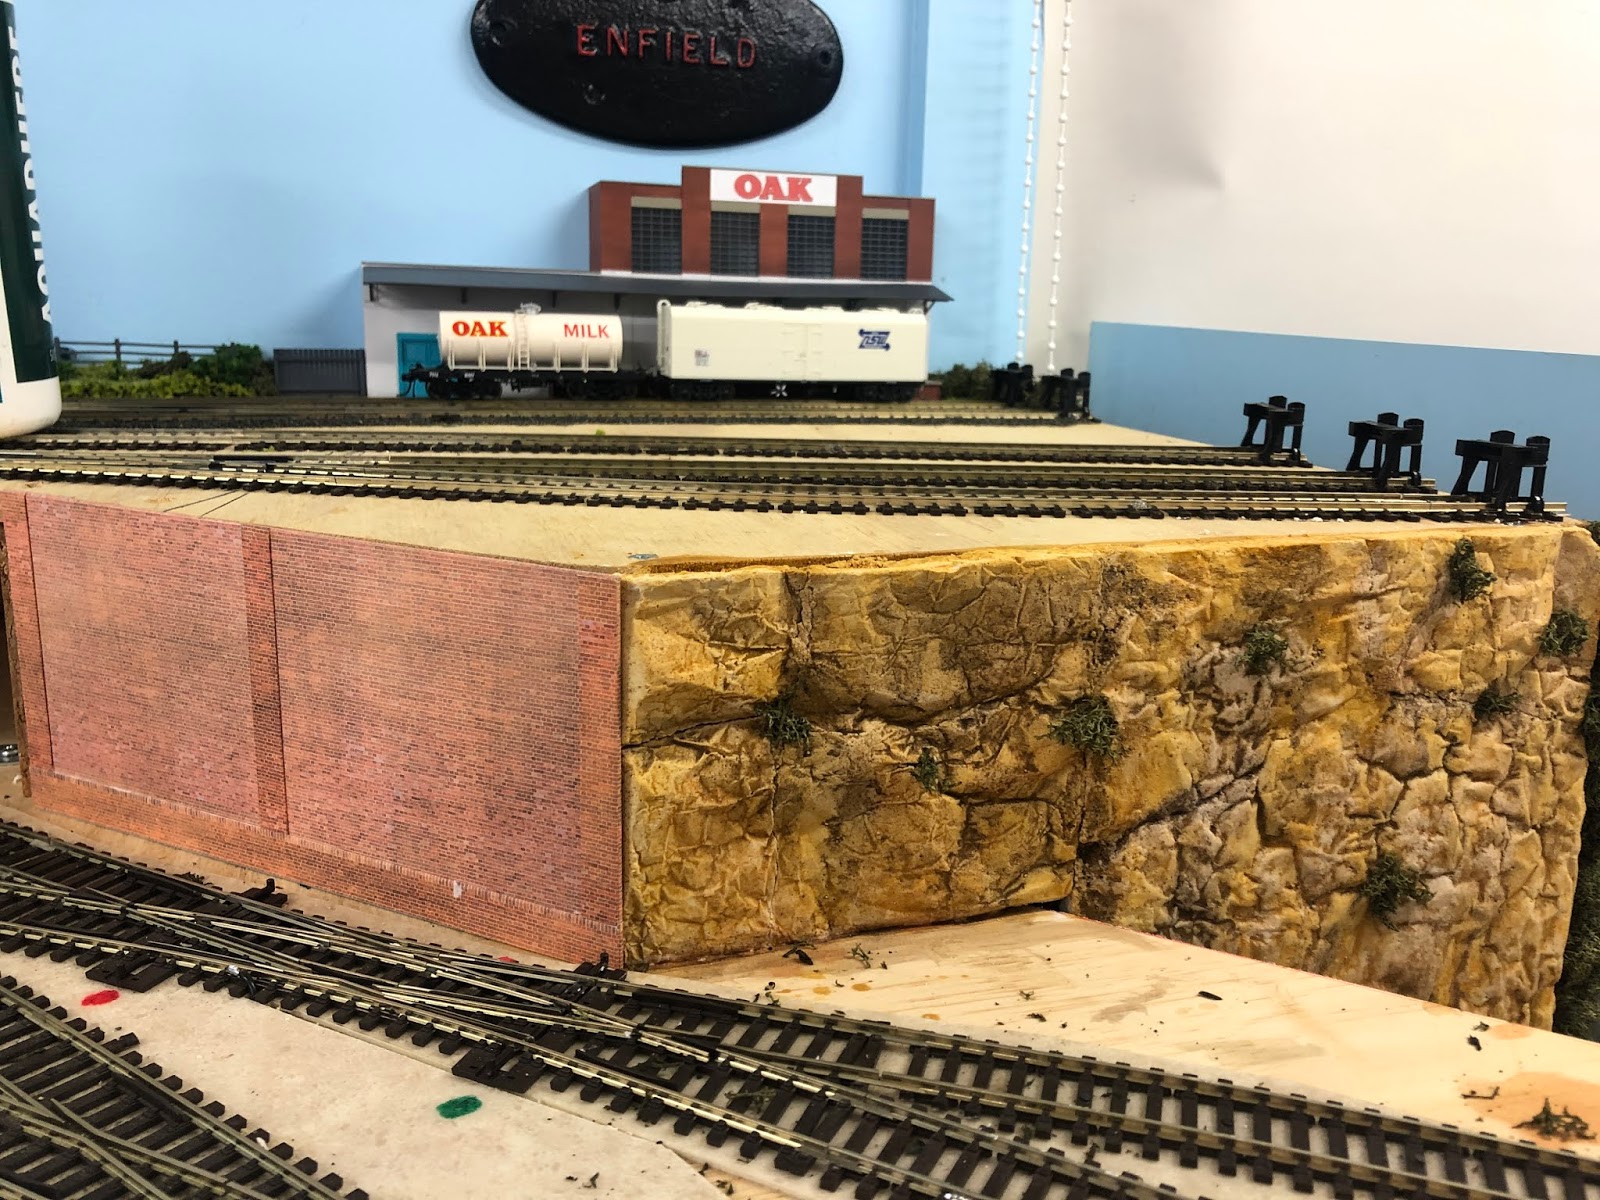
I also a started building a retaining wall. This was done with Scalescenes retaining wall kit. The kit was not built as per the instructions but made in such a way that it fits in the space available. If you've not seen Scalecenes before click here. You buy their kit and run it off as many times as you need to.

Everything finishes flush with the top of the above baseboard. The concrete for the oil depot will sit on top.

The retaining was was needed as the next section was a bridge.


More Scalescenes retaining wall was printed off. 

The brick wall is glued onto matte board used by people framing artworks or photos. I have some offcuts kicking about. The plinths at the bottom are glued onto double thickness cardboard. The columns are glued onto thin card and then glued on after the plinths have been added. At all stages of construction effort was made to wrap the paper around the cardboard.

The bridge was completed with some girder shaped Evergreen styrene strip painted grey. The inspiration came from the flyover at the western end of Strathfield station. I'll need to add some more to stick underneath the top baseboard to hide the empty cavern.

The aim of this was to complete this bit before finishing off the oil depot on the top.


Now I have started this bit. I have cut the packing cardboard from an old corrugated cardboard box. This had a bulk order of cat food in it. The large section near the camera will be the last bit to be glued down. I'm going to use Scalescenes concrete to complete the oil depot. This came as part of a dockside kit which I bought years ago. The gaps between the tracks will be glued onto cardboard and then glued onto the the packing cardboard. The large section will have the paper wrapped around the visible edge to tidy it up. In between the rails, the concrete paper will be glued to cardboard and then glued onto the sleepers.

Jobs for this week:
1. Apply static grass between the run around track and the first oil depot siding.
2. Finish off the packing pieces of cardboard. (I only have two bit to go and they are straight.)
3. Cut out the top bits of card and print sheets of concrete paper.
4. Glue it together.
5. Ballast track.
6. Glue more static grass (not on the same day or the grass sticks to the ballast.)
7. Put up fence.
8. Repair oil loading platform.

I'm hoping to get the top four done at least.

Until next time.


Monday 22 April 2019

The Rock Wall Continued

First thing this morning I had a look at the last night's mould. 


It looked pretty good so I trimmed it and glued it into place.


It was a little fragile which caused it to break. Some of the large piece I placed yesterday earlier was coming off the wall. A fair bit of PVA glue was used to stick it all back together.

I came back to it all in the afternoon. The walls were holding together well. I figured that it would be a good time to break out the paints.

When I researched making the rock walls, there were also videos on how to paint them. Basically, you make a wash. Most of the demonstrations were using grey as a base colour. I used a wash of raw sienna as a base colour for sandstone.


A bit of burnt umber was applied next to try and highlight some cracks.


This wash may have been a bit too thin and may was washed off some of the raw sienna.

A bit of gold ochre was dabbed on to add a couple of highlights. The paint had separated in the tube and wasn't that great to use.


In front of the rock wall will be a building but down the uneven edge, I'll glue some lichen. This will stick out from behind the Billabong Marina section and hopefully blend the two bits together. I reckon that I might glue some bits of flock on parts to represent small plants growing.

The section to the left of the rock wall will be a brick retaining wall leading up a bridge or a tunnel portal.

Once that is done, I can finish off the oil depot.

Until next time.

Sunday 21 April 2019

The Rock Wall Experiment

In yesterday's post I showed the mould for the rock wall. I  put it all together around lunchtime. I checked on the casting in the evening. It turned out pretty successful.


There were a tonne of bubbles which needed attention. It wasn't total dry but I figured that I could put it into place. A quick measurement and dry fit showed that It needed a trim. To do this, I used an old kitchen knife. It was a bit like a thick fudge. There was more than one go at cutting and trimming. The top broke off in a couple of places but that would add to the cracks.

In the end I put it into place.


This is where Billabong Marina meets the rest of the layout. As you can see, my carpentry skills aren't brilliant. I'm hoping that painting the right colour on the timber and gluing some lichen onto the corner will help hide the join and ease the transition.

I left it to dry over night but I reckon it might be a good couple of days before it totally cures.

In the meantime, I started on another section of rock wall, using the same alfoil mould.


I've bent the foil to make sides for a 10 x 13 cm section. I mixed up all of the remaining Polyfila powder and poured some of the excess into a section next to it as I might be able to use some of it later.

Until next time and happy Easter.

Friday 19 April 2019

Tamping Some Ballast

A quick trip to the train room yesterday sorted out some of the static grass.

As I had a bit of extra time up my sleeve yesterday evening, I carried on with some ballasting.


The ballast tamper helped out a bit. I had to stop at the end of the platform as I need to install a couple of surface mounted point motors before I carry on. That's a job for another day.

In the meantime I can work forward on this part of the layout. I have a goods siding and an oil terminal to put in.

The oil terminal looks pretty easy. Most of it will be set in concrete. I'm tossing up between Scalescenes concrete print or using some styrene sprayed light grey.

Before this, however, I need to work out what happens to the level below.


I'm considering a small exposed rock wall that will finish at the top of the top baseboard. I had a quick look as to how to make it cheaply. One example was to make a mould using alfoil and casting plaster. It dries in about an hour.

I don't have any casting plaster so I used some powdered Polyfilla. Right now, it looks like this. It will take a lot longer to set. 


This is for a section which is 18 cm x 19cm to fit in next to Billabong Marina and below the oil terminal. I reckon that I might need to give it 24 hours to set.

With a lot of walling, I might need to invest in a bag of casting plaster. My local Bunnings, however, doesn't stock it.

Until next time.


Thursday 18 April 2019

The Dairy Part 5

Today the dairy was finished.


The coping stones and a small concrete slab were painted.

Then it was removed so that the track could be ballasted and some landscaping begin.


Tomorrow the bare patches will be hit with some static grass.

Until next time.

Wednesday 17 April 2019

Some Landscaping

The dairy is waiting on coping stones to be painted. This involves getting the airbrush out and tomorrow could be a good day for it.

In the meantime, the gap between the dairy and the station needs to be looked at.


A small piece of polystyrene foam was cut and shaped to fit. It is a bit lower than the station platform but I thought that a small bush would be able to hide the gap. The jacaranda tree was purchased at the Forestville exhibition at the start of March. It is meant to be O scale but seeing some of the huge jacarandas about, I didn't think that it would be out of place. 

The foam is covering a 2 cm gap between the edge on the baseboard and the wall which you can see beyond the foam. The jacaranda helps to balance the foam so that it stays on the baseboard.

What to do with the gap beyond the foam? Fence it off with some Walthers fencing. I bought some when building Billabong Marina and have some left over.

The foam was painted burnt umber. I had some old Chromacryl paint and I have had it for years. When I gave the tube a bit of a squeeze to find out how much was still in the tube, the tube cracked. Now I have a brown stain on my floor. Fortunately I had a newer tube which I used.

When this dried, I broke out my Mod Podge and scatter material. I gave it a good coating of Mod Podge, which after a couple of years, is getting gluggy. I then sprinkled on some dyed sawdust, stuck on some lichen and some larger foam scatter material.

I used some sawdust and dirt from my chainsaw for the leaf litter under the tree.

I figured that it would need something else. Something to stop plastic people from straying onto the tracks. I needed another fence. I had some four rail fence but it didn't have enough post to stick it into the foam. I cut the bottom rail off but even towards the bottom of the slope this was causing problems. I have hidden the gap between the bottom of the post and the foam with some ground cover.

The end result looks like this.


There is still plywood visible below it as the foam was removed and worked on somewhere else. I am hoping as some stage to add a back scene so I need things to be removable for when this happens. Where foam was worked on ended up looking like this.


Not bad for an evening's work.

Until next time.